How to Set Up Multiple Store Fronts with Magento

This tutorial will walk you through the setup of multiple store fronts running off one Magento back-end and database. Once we have set the store up in the database we will be exploring two methods of creating the store fronts on the physical server. The method you select will have to do with server requirements, how you wish your store to operate, and, to some extent, budgetary constraints.
Using separate directories for all stores
Works for all versions of Magento.
Using a shared directory for all stores
This is my preferred method. I find it to be the most expedient when working with a large amount of store fronts. This method works on all versions of Magento higher than 1.4
Create a New Store in Magento
To start off, the first step in setting up multi-store functionality is to create the new store(s) in the Magento Admin application. Follow the steps below to create a new store:
Go to Catalog→Manage Categories in the top menu.
Click Add Root Category.

In the Name field, enter your new store name. Under Is Active select Yes.
In the Name field, enter your new store name. In the Code field, enter a unique string without spaces.
Click Create Store.
In the Website field, select the website you just created. In the Name field, enter a name for your store. In the Root Category field, select the Root Category you wish to use for the store front. Then click Save Store.

Click Create Store View.
In the Store field, select the store you just created. In the Name field, give your view a name (typically “English”). In the Code field, enter a unique string to identify the store view. Change the Status to Enabled. Then click Save Store View.

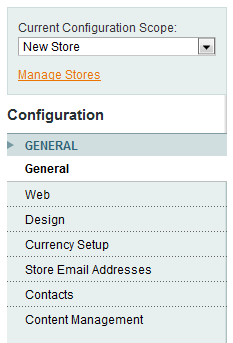
Go to System→Configuration.
In the Current Configuration Scope, select the Website you just created.

Select the Web menu option, and expand the Unsecure and Secure sections by clicking them.
For each section, deselect the Use Default box next to the Base URL and enter the URL for your store, including the trailing slash. When you are done, click Save Config.

Configure the Server to Load the New Store
Now that you have your new store created, you need to configure the server to load the right store. There are several methods for doing this. We present the two most popular methods below. The first method is the older of the two, and will work for any version of Magento. The second method takes advantage of changes made to the index.php file introduced in version 1.4.0.1.
Method 1: Separate Directories for Each Store (Using Secondary Domains)
Mage::run('newstore', 'website');ln -s /home/example/example.com/html/app/ app ln -s /home/example/example.com/html/includes/ includes ln -s /home/example/example.com/html/js/ js ln -s /home/example/example.com/html/lib/ lib ln -s /home/example/example.com/html/media/ media ln -s /home/example/example.com/html/skin/ skin ln -s /home/example/example.com/html/var/ var
Method 2: Shared Directory for All Stores (Using Pointer Domains)
Use the following guide to create a Pointer Domain for your new store:
SetEnvIf Host .*newstore.* MAGE_RUN_CODE=newstore
SetEnvIf Host .*newstore.* MAGE_RUN_TYPE=website
If SetEnvIf Doesn’t Work
Try the following:
Edit the .htaccess file in the document root of your Magento Installation.
RewriteCond %{HTTP_HOST} .*newstore\.com [NC]
RewriteRule .* - [E=MAGE_RUN_CODE:newstore]
RewriteCond %{HTTP_HOST} .*newstore\.com [NC]
RewriteRule .* - [E=MAGE_RUN_TYPE:website]


Hi There! This was a great post and has been a great help – but I wonder if there’s something else, or whether something has changed in Magento 1.9.1.0??
I’ve set up my multiple stores using the second method that you suggest, but I’m struggling to get them to show specific home pages. I have created a second instance of ‘home’ in the CMS Pages section (and called it ‘home3’), but when I try to set them to point to each of the stores, I get a response on the front end that says ‘There was no Home CMS page configured or found’.
If I set the home page as relating to the default store again it all works, but both domains show the same home page. It’s really key that I can show different home pages!!!
I hope you still maintain the site, and I’d be really grateful if you have any pointers that may help.
Many thanks,
Dom
Dom,
The method of setting up multiple stores is the same in Magento CE 1.9.1. The issue you are most likely running into is you have not assigned your “Second Homepage” (assuming this is the page title) to the website/store inside the configuration. Please note, you don’t have to call the second homepage URL “home3” either, as they are unique to each website/store they can both have the same URL key of “home” if you wish.
Navigate to System>Configuration and then under the “Current Configuration Scope:” drop-down select the website/store you wish to assign.
Once this configuration scope has loaded open General>Web>Default Pages
For “CMS Home Page” uncheck the “use default” option and instead select “Second Homepage”
Save the configuration and refresh the website cache. Also Flush the Website cache for good measure.
Also ensure that under CMS>Pages that “Second Homepage” is set to display under the second website/store under the “Store View” option of the pages interface.